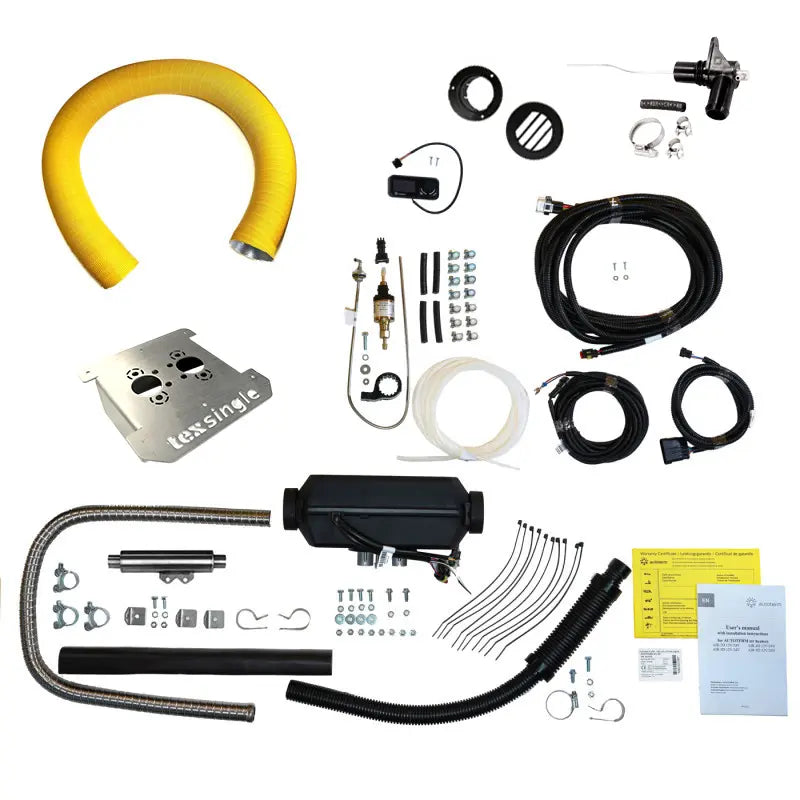

Parking heater kit for Fiat Ducato, Citroen Jumper and similar - Autoterm 2kW parking heater and accessories
Parking heater kit for Fiat Ducato, Citroen Jumper and similar - Autoterm 2kW parking heater and accessories
Couldn't load pickup availability
Ducato Installation Kit for Autoterm Air 2D under the Passenger Seat
This complete set contains the suitable components for installing an Autoterm Air 2D space-savingly under the passenger seat of a Fiat Ducato or a similar vehicle. Instead of having to find a flange, warm air duct, control panel, and fuel supply individually, you get a solution tailored to this installation situation here.
The most important advantages at a glance
- Space-saving installation of the Autoterm Air 2D under the passenger seat
- Suitable for Fiat Ducato and similar vehicle models
- Autoterm Air 2D with 2 kW heating power and altitude kit
- Easy fuel tap for particularly simple fuel extraction
- Installation flange for clean and thermally decoupled mounting
- Comfort Control including 3 m extension cable already included
- Short warm air duct with outlet directly at the seat console
- Complete installation kit including exhaust muffler and mounting material
In vehicles of the Ducato family, there is a comparatively generous installation space under the passenger seat. This allows the auxiliary heater to be accommodated inside the vehicle without losing valuable space in cabinets, seat benches, or the rear storage compartment.
At the same time, the cable runs remain short: The warm air outlet is located directly at the seat console, the vehicle tank is easily accessible, and both exhaust gas routing and combustion air intake can be routed to the outside through the vehicle floor over a short distance.
The kit is generally suitable for:
- Fiat Ducato,
- Citroën Jumper,
- Peugeot Boxer and
- Opel Movano from model year 2021.
The Heater
The heart of the kit is the Autoterm Air 2D with 2 kW heating power. The compact diesel air auxiliary heater is ideal for vans and campers and can be easily accommodated under the passenger seat console due to its small dimensions.
The Autoterm Air 2D has proven itself for many years even under demanding operating conditions and scores with:
- robust and durable construction,
- easy repairability,
- E-mark,
- warranty retention even with self-installation,
- automatic altitude adjustment and
- low fuel and power consumption.
Altitude Kit
The heater is equipped with an altitude kit. This automatically adjusts the fuel supply to the altered air pressure conditions at higher altitudes.
However, this does not mean that no deposits can form during continuous operation at a low power level. Therefore, operate the heater at full power for about an hour at least every one to two weeks. This will make the combustion chamber properly hot and existing deposits can burn off.
Also included: the complete installation kit
- low-noise Autoterm fuel pump "Extra Quiet"
- stainless steel exhaust muffler
- rubber holder for the dosing pump
- wiring harness for dosing pump and heater
- intake air hose with integrated muffler
- heat protection hose
- end piece for the exhaust pipe including clamp
- fuel line and line connectors
- metal exhaust corrugated pipe
- screws, nuts, clamps, heat shrink tubing and cable ties
- owner's manual
Installation under the passenger seat
The Autoterm Air 2D is mounted inside the passenger seat console. This keeps the heater protected inside the vehicle and does not take up additional space in the living or storage area.
For mounting, a rectangular cutout is made in the vehicle floor under the seat console. The installation flange included in the kit is inserted into this cutout and creates a clean routing for fuel connection, combustion air intake and exhaust gas routing.
Under the vehicle, the standard heat shield in the area of the seat console must be temporarily removed for installation. A suitable opening for the exhaust pipe will later be made in the heat shield.
Installation flange
The set includes a stainless steel installation flange for vehicle floors up to 48 mm.
Instead of drilling several individual holes for the heater connections into the vehicle floor, only a rectangular cutout is required with the flange. This ensures that the heater and its connections are stress-free and cleanly aligned.
The flange also ensures thermal decoupling between the heater and the vehicle floor. The area around the cutout is carefully sealed from below with a suitable sealant.
Since the floor insulation under the passenger seat console is often relatively thick, an additional elevation for the flange may be required depending on the vehicle. This can, for example, be made from suitable wooden strips or aluminum profiles.
Easy Fuel Tap
A major advantage of this kit is the particularly simple fuel extraction. The easy fuel tap included in the kit can be inserted via the easily accessible tank sender unit between the driver's and passenger's seat, without having to remove the entire tank sender unit or drill into the vehicle tank.
To do this, the existing connection for the tank ventilation is replaced by the fuel tap. The pre-bent extraction pipe is inserted into the existing opening and then connected to the auxiliary heater's fuel line.
This saves time and reduces the risk of typical problems such as leaks or diesel odor, which can arise from unnecessary interventions in the vehicle tank.
The fuel line can be routed along the standard fuel lines on the vehicle floor. Suitable, protected areas for mounting the fuel pump are located on the tank's retaining straps. The installation requirements from the Autoterm Air 2D manual must be observed.
Warm air ducting
Since the heater is located directly under the passenger seat, only a very short warm air duct is required. The kit already includes:
- 0.5 m of warm air pipe with 60 mm diameter,
- a rotatable 60 mm outlet,
- the corresponding connection piece, and
- the required mounting clamps.
The outlet is inserted into the seat console or its trim. Depending on the design of the seat console, it may be necessary to create a suitable opening or to make a small mounting frame for the outlet.
The short piece of warm air pipe connects the heater outlet directly to the outlet. Make sure that the pipe is not crushed and is laid as much as possible without tight bends. Free airflow is important to prevent heat buildup and a safety shutdown of the heater.
Control and operating element
Comfort Control
The proven Comfort Control is already included in this Ducato kit. The control panel features a multi-function rotary knob and a clear display.
It offers, among other things, timer functions, thermostat operation, a voltage display, a burn-off reminder, and voltage monitoring, which can safely shut down the heater if the battery voltage is too low.
3 m extension cable included
The standard cable for the control panel is approximately 1.8 m long. Since the heater is located under the passenger seat and the control panel is often intended to be mounted further back in the living area, this kit also includes a 3 m long extension cable.
This allows you to flexibly mount the Comfort Control in an easily accessible location in the vehicle, without having to order another extension cable directly.
Exhaust gas routing and combustion air intake
Combustion air intake, exhaust pipe and fuel line are connected to the heater from below. The combustion air intake can be arranged protectively above the standard heat shield.
A suitable opening is made in the heat shield for the exhaust pipe. The exhaust pipe, together with its heat insulation, is routed through this opening. The exhaust muffler can then be securely attached to the heat shield and the end piece of the exhaust system can be routed along the standard vehicle exhaust.
What's included in the Ducato installation kit?
- Autoterm Air 2D diesel air auxiliary heater with 2 kW heating power, 12 V
- complete Autoterm installation kit including exhaust muffler
- Comfort Control operating unit
- 3 m extension cable for the operating unit
- stainless steel installation flange for floors up to 48 mm
- Simply fuel tap for easy fuel extraction
- 0.5 m warm air pipe with 60 mm diameter
- rotatable 60 mm warm air outlet
- 60 mm connection piece for the outlet
- two mini-jaw clamps
- optional: suitable adhesive or sealant for installation
What else you need
For vehicle-specific installation, some small parts may still be required depending on your seat console and the chosen implementation. These include, for example:
- screws for fastening the flange to any necessary elevation,
- material for the flange elevation, such as wooden strips or aluminum profiles,
- rust protection for the cut edges in the vehicle floor, and
- if necessary, material for a mounting frame for the warm air outlet.
Who is the Ducato kit the right solution for?
This kit is ideal if you want to install an Autoterm Air 2D in a Fiat Ducato or a similar vehicle and want to lose as little storage space as possible.
By installing it under the passenger seat, the heater, warm air ducting, and control technology remain compact in one place. At the same time, the suitable installation flange and the easy fuel tap significantly simplify two of the most complex steps when installing a diesel auxiliary heater.
You will not receive a random compilation of individual components, but a complete set that is tailored to a proven installation situation in the Ducato family.
Versandinfos
Bitte beachte, dass einige unserer Produkte außergewöhnlich groß, schwer oder zerbrechlich sind. Abhängig von den Versandanforderungen nutzen wir Sperrgut- oder auch Speditionsversand sowie unterschiedliche Versanddienstleister. In Kombination mit der Versandversicherung können hierdurch höhere Versandkosten entstehen. Bei Fragen zum Versand, nimm gerne Kontakt zu uns auf.
Technical Data
Technical Data
SKU:39004
Share